Tuesday, November 13, 2012

Super Cinnamon Rolls


Cinnamon rolls are a lengthy project but I have developed a great system to make them easy and company ready in no time! The secret is to prepare them ahead of time and freeze them individually. They taste wonderful, if not better, when thawed from the freezer. With a quick trip to the microwave you become super chef in no time! This recipe always gets great reviews too!

Rolls:                                                           Measure the roll ingredients and place on the "dough cycle" 
1 cup warm milk (105F to 115F)                 (do not delay start due to yeast). You can also mix the 
2 Eggs                                                          ingredients manually and knead and rise the dough.
1/3 cup butter, melted
4 1/2 cups all-purpose flour
1 teaspoon salt
1/2 cup granulated sugar
2 packages of quick active yeast

Filling:                                                         While waiting for the dough, mix brown sugar and 
1 cup packed brown sugar                           cinnamon together.
2 Tablespoons ground cinnamon
1/3 cup softened butter

When dough cycle is complete. Remove the dough and place on Roul'Pat. Roll out into a rectangle (or funky rectangle like mine!) Spread softened butter on dough using the spatula


 Generously sprinkle the brown sugar and cinnamon mixture evenly.
 Roll up the dough by tucking in the long end.
When the dough is rolled together. Here is the fun part: Head to the bathroom and get some unflavored dental floss. Use the floss to "cut" the dough into slices. Once you discover how nice floss works with delicate dough like this, you may find yourself keeping an extra stash in the kitchen! The other benefit is that the floss can't ruin the Roul'Pat like a knife would.

 Now place your rolls into the desired pan(s) to be cooked. I used two large round molds and it worked fantastic! Plus, super easy to clean the sticky carmel off the pan! Bake at 350 degrees for 20-25 minutes (more time if using a different pan)

 Here is the finished product. Yum! Once cooled, place each roll in an individual ziplock freezer bag and store until ready to serve. It takes about 1 1/2 minutes on medium power to reheat. Drizzle with frosting recipe below.


Frosting:
3 oz whipped cream cheese
1/4 cup softened butter
1 1/2 cups powdered sugar
1/2 teaspoon vanilla

Whip up the ingredients in a mixer and serve on the side or on top of rolls. This recipe will hold up really well in refrigerator for a week.

 ENJOY!
(recipe courtesy of Gold Medal Flour)

Sunday, November 4, 2012

Cleaning aluminum baking sheets

A big component of the Demarle at Home Cooking systems are the perforated baking sheets. The holes in the pan allow the perfect airflow to anything you are cooking with. Unfortunately, these pans do get build up on them and over time loose their shiny metal look. I found the cure to clean them!


In this photo you can see and compare the difference of the pans.

Half the pan is clean and half not in the photos below.


The ingredients are simple and natural but the results are amazing with a little bit of elbow grease!


1 Tbls. Cream of Tartar
2 Tbls. Lemon juice (I used the fake lemon since I had no lemons at home)
2 Tbls. White vinegar
2 Cups of hot water


Mix it together and dip your scrubber (scrubbing brush, pad, or scour pads work) into the solution. And scrub, scrub scrub. You should see it clean pretty easily.


And here is the final result....  YEAH, good as new!


Saturday, November 3, 2012

Easy Baguette for any cook!

Subway has the best bread! There is one secret to achieving the Subway bread at home and it so easy you will be the best cook on the block!

It's DeMarle at Home silform bread tray!http://www.mydemarleathome.com/shop/productdetail.aspx?prod=SF000295 Don't forget that all our pans need the perforated pan to perform at their best!

This recipe is SO easy and it's fat free too! Its from the Demarle at Home Beginnings and Endings Cookbook.

Crusty Fat-Free Bread 

Ingredients: 
1 envelope rapid-rise dry yeast
2 cups lukewarm water 
1 tablespoon salt
1 tablespoon sugar
4 1/2 to 5 cups all purpose flour
Seasonings on choice (I used herbs de provence)

(2 cups of boiling water in a oven proof dish on bottom rack)

In a mixing bowl, dissolve yeast in warm water. Add salt and sugar and mix well. Beat in flour, one cup at a time, with a wooden spoon until a smooth ball forms clearing the sides of the bowl. Cover and set aside in a warm place until it doubles in size (about one hour). Flour your hands and put a little flour on the Roul' Pat (yep, it is some sticky dough even for a Roul' Pat!) Knead a few times (if you can, its pretty sticky!) Cut the dough in half, and then in half again so you have 4 balls. Don't use anything sharp on the Roul' Pat or bread form! Place oven rack in center and heat oven to 400 degrees F. Place your pan (I used my sunflower mold on another pan) on the lowest bottom rack. Then pour your boiling water in the pan. While the oven is heating, shape your dough into 4 baguette shapes on the silform tray with your perforated pan under it. Let them sit until oven is ready. Apple small slits into the bread, lightly brush with olive oil and sprinkle on the seasoning mix. Bake for 25-30 minutes until crusty and brown.
And there you have it, your own Subway bread at home!

Pumpkin Muffins!

It's that time of the year again where the scents of evergreen and pumpkin whisk you away into holiday dreaming. These muffins are absolutely incredible! What makes them so amazing is the straight muffin pan from Demarle at Home! Clean up is a breeze and you guests (or kids!) will be begging for another.

As you can see, these aren't just any pumpkin muffin. These are deluxe pumpkin and apple streusel muffins.

find the recipe here:http://allrecipes.com/recipe/pumpkin-apple-streusel-muffins

There are over 500 excellent reviews on this muffin and I can see why! These muffins taste even better in the Demarle at home straight muffin pan. See, any baking is made so much better when there is airflow to what you are cooking. Combine this with the silicone and glass woven together and you have perfect crisp texture on the outside with a soft, perfectly cooked inside. These are bakery worthy!

See the spills? No big deal because it literally falls off these pans. I've never, EVER enjoyed the clean up because I am such a messy cook. BUT, with these pans, there is hardly anything to clean. Take a look at how they pop out of the pan. No papers needed!


Tuesday, October 23, 2012

Angry Bird Cake

This year my daughter wanted Angry Birds on her cake. She specifically wanted a 3 tier cake with a slingshot of course.

This is what I created...


I could have bought a slingshot and placed it on the cake but would Chef Duff do that? So I went for a Rice Krispy treat version and covered it in melted chocolate, put it on a stick, and placed it through the layers(I also did this for the little TNT boxes). I used a rolled Airhead for the sling. The birds were purchased from Amazon.

I used to find fondant very difficult to work with. I was looking around Amazon one day and came across fondarific fondant. It was rated high and nut free! Score! I tried it out on my sons cake and it worked great (it also tastes better then most fondant). See below...


A Super hero lovers dream!


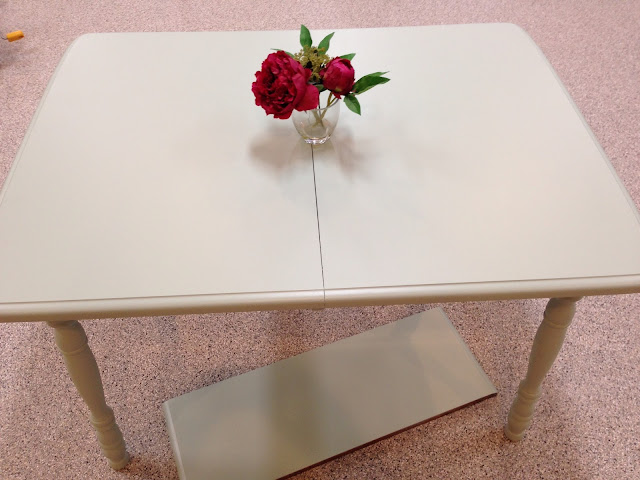
Shabby table to chic look

I love this transformation! A table I bought at Goodwill for 4$ and transformed it for under 20$.


Here is my secret weapon. 1-2-3 primer- No sanding needed! I sprayed the legs and used a foam roller for the top. Foam rollers are very important when panting furniture.

After letting the primer dry overnight. I mixed the paint. Ever hear of Annie Sloan chalk paints? They are sweeping the furniture painting lovers off their feet. You shouldn't need to even paint primer with this paint but I did anyway. It covers nice and I wasn't doing any antique finish to it.


Ever notice the clearance paint flubs at Home Depot and Lowes?


These paints are generally $11-$15 if mixed a color of your choice. Isn't this a cool color for $2.50?
To make the chalk paint, I started with a quart measuring pail and figured out what 1:4 ratio (1 part Plaster of Paris and 4 parts paint) was needed. I measured the Plaster of Paris first, dry, then added water and mixed it till it was smooth. Usually 1 Tablespoon at a time till the desired consistency. Finally, I mixed the paint together with the Plaster of Paris mixture.

Beautiful!


There is one final step. Adding water based polyurethane. I used a spray on version from Menards that had very little smell. I applied 4 coats of this as directed several hours apart. 


The piece on the floor is the leaf for the table. I love how this color came out! 


Thursday, October 18, 2012

Open frame design

Open frames are a fun way to class up the wall and make it interesting. Here is what I got at my favorite store- Goodwill. All these frames were 2.99 or under....
They all look like a nice color in this picture but they are actually different shades of gold.


And here is what was inside some of them.... (Look beyond what you see)


Pretty, Huh?

I purchased a flat black spray paint and 3M medium abrasive scrubber. I painted the frames and let them dry overnight. I then used the scrubber to return the gold finish along the edges and design of the frames. This is my end result...

And the finished product on the wall...
Total cost: around $15.00


Thursday, May 17, 2012

Homemade Soup -YUM!

It's so easy to make your own homemade noodles with or without professional equipment. Here is one of my favorite recipes for soup with no fancy frills just good ol' yummy flavor.

First, make the noodles: 


    • 2 1/2 cups all-purpose flour
    • 1 pinch salt
    • 2 eggs, beaten
    • 1/2 cup milk
    • 1 tablespoon butter

    • In a large bowl, stir together the flour and salt. Add the beaten eggs, milk, and butter. Knead dough until smooth, about 5 minutes. Let rest in a covered bowl for 10 minutes.

    • On a floured surface or a wonderful Roul'Pat, roll out to 1/8 or 1/4 inch thickness. Cut into desired lengths and shapes.

    • Let noodles sit and air dry before cooking. As you can see from above, there is no rule on how to cut the noodles. Once they are in the pot, no one can see the difference.


    • For the best chicken noodle soup, I purchase a rotisserie chicken from the grocery and when its half eaten (skins and ties removed!)its added to a pot of water no measuring needed! Add a 1.2 chopped onion. Let the chicken and onion work their mojo on low until the meat is falling off. Pull out the chicken as careful as possible making sure no bones are left behind!

  • Let the chicken cool and then pull off the remaining meat adding it to the pot with:
  • 4 large carrots chopped
  • 2 stalks celery chopped
  • salt and pepper to desired taste


  • Once carrots are tender, bring pot to a boil and add noodles. The noodles will get larger when cooked. Cook for approx. 5 minutes. 

  • Add chopped FRESH flat leaf parsley before serving. Love the green serving spoon?

Sunday, April 29, 2012

Lemon Coconut Tarts

Here's a great spring time recipe...


Lemon Curd:
8 Large Egg Yolks
Grated zest of 3 Lemons
1/2 Cup fresh Lemon Juice (squeeze after zesting!)
1 Cup Sugar
Pinch Salt
10 Tbsp. cold unsalted butter (cut into small pieces)


In a pan whisk egg yolks, zest, juice, sugar and salt. Cook over medium heat, whisking constantly!, until mixture thickens-approx.10 minutes. Remove from heat and whisk in butter 1-2 pieces at a time until melted. Cover with plastic wrap pressing to surface of curd and refrigerate at least 4 hours.


Coconut Crust:


3/4 Bag of sweetened flake coconut (about 3 1/2 cups)
1 cup of cookie crumbs (I like shortbread)
4 Tbsp. unsalted butter, melted and cooled


In a food processor add cookies and pulse until they are crumbs. Then measure the crumbs to make sure you have 1 cup. Return to food processor and add coconut. Pulse and slowly drizzle butter in until the crust becomes crumbles. Firmly press into your choice of mold: tart mold for a whole tart or I used the new crown mold for mini tarts! Bake at 350 degrees for 15-20 (watch closely because coconut browns quickly! Once removed from oven, leave in the mold till completely cooled or the tarts will break. When cooled, fill tart will lemon crd filling and serve. Dress it up with whip cream or powdered sugar. YUM!


Easy Jello Molds

Easy Jello Molds


Have your Jello Jiggles ever ended up like the pan in the bottom of the picture? See the difference of DeMarle at Home? The silicone and woven glass create a amazing kosher certified non stick solution to everything! See these fun shapes I made with the mini tartlet tray (one of my favorites for anything bite size!)


Thursday, April 19, 2012

GIVEAWAY!


I am planning a fun giveaway to launch my new business with DeMarle at Home. Please take a look at my web page, browse, shop, see what great things we have to offer. Come back and comment to me what items we have that peak your curiosity! Win a FREE DeMarle at Home flexipan (value $36.95) and see why I love these products so much!


So, How do you enter?

1. Go to my website and click the shop online tab. Come back and comment on this post tell me what you items you like!
2. Like this Blog on Facebook
3. Send your friends and get extra entries if they post you sent them!
4. Find out who wins May 15th!!!

*Join in April for the great price of $129.95 and receive our New Improved Business Kit valued at over $380 – Plus as a “Welcome to Demarle at Home Gift” receive your choice of any $36.95 mold for free!
Contact me!!!
EASY MEATBALL RECIPE

What you need:
1 box 6oz. stuffing mix (such as stovetop)-I prefer cornbread flavor
2 lbs ground beef
1 1/4 c Chicken Broth (or water)
2 eggs

Mix all the ingredients together-

Use a cookie scoop or your good ol' hands to make 1 inch balls. Place on a Silpat and Perforated Pan 


Bake at 400 degrees for 15 minutes or until done. These can be eaten as seen below for little bites, added to spaghetti sauce for spaghetti and meatballs, or even gravy for a savory noodles and gravy. Your options are endless, enjoy!!!


With two small children who enjoy vegetables in many ways, I realize I am a lucky mom. I know there are many children out there (not anyone's fault) that have a real aversion to certain types and colors of vegetables. I have been enjoying my new gadget (below) World Cuisine spiral slicer! While this may seem weird to post on my DeMarle at Home blog, they actually do work well together. This creates such an awesome spiral noodle shape it may actually have your kids begging for seconds. I have sliced 3 medium zucchini's on this plate (side dish for a family of 4). Zucchini is a great vegetable for kids because it absorbs the flavors you put into it possibly disguising its relation to a veggie! A simple version to make is use the large round flexipan with hexagon cover and a tiny bit of water to steam the zucchini for a couple minutes in the microwave. Uncover carefully! Add butter, salt and pepper and good quality parmesan cheese. YUM!!!


Friday, March 2, 2012

Donut Muffins


These tasty bites will light up any brunch!


  • Ingredients

  • 1/2 cup white sugar
  • 1/4 cup margarine, melted
  • 3/4 teaspoon ground nutmeg
  • 1/2 cup milk
  • 1 teaspoon baking powder
  • 1 cup all-purpose flour
  •  
  • 1/4 cup margarine, melted
  • 1/2 cup white sugar
  • 1 teaspoon ground cinnamon

I used the mini tartlet tray, perforated baking sheet, and silpat for after dipping. This recipe would work fantastic in any of our pans but they taste fantastic as a mini bite. 

  • Directions

  • Preheat oven to 375 degrees F (190 degrees C). 

  • Mix 1/2 cup sugar, 1/4 cup margarine, and nutmeg in a large bowl. Stir in the milk, then mix in the baking powder and flour until just combined. Fill the prepared mini muffin cups about half full.

  • Bake in the preheated oven until the tops are lightly golden, 8-10 minutes in mini tartlet tray or 15 to 20 minutes in mini muffin tray.

While muffins are baking, place 1/4 cup of melted margarine in a bowl. In a separate bowl, mix together 1/2 cup of sugar with the cinnamon. Remove muffins from their cups, dip each muffin in the melted margarine, and roll in the sugar-cinnamon mixture. Let cool and serve.

(This recipe is courtesy of Diane posted on Allrecipes.com)

Focaccia Bread


Ingredients


Directions

Combine the warm water, yeast and sugar in a small bowl. Put the bowl in a warm, not hot or cool, place until the yeast is bubbling and aromatic, at least 15 minutes.
In the bowl of a mixer fitted with a dough hook, combine the flour, 1 tablespoon of kosher salt, 1/2 cup olive oil and the yeast mixture on low speed. Once the dough has come together, continue to knead for 5 to 6 minutes on a medium speed until it becomes smooth and soft. Give it a sprinkle of flour if the dough is really sticky and tacky.
Transfer the dough to a clean, Roul’Pat®(or floured surface), then knead it by hand 1 or 2 times. Again, give it another sprinkle of flour if the dough is really sticky and tacky.
Coat the inside of the mixer bowl lightly with olive oil and return the dough to the bowl. Cover it withplastic wrap and put it in a warm place until the dough has doubled in size, at least 1 hour.
Coat a Deep Flexipat with 1/4 cup olive oil. (This is not necessary for these pans but it is for flavor and focaccia is an oily crusted bread).

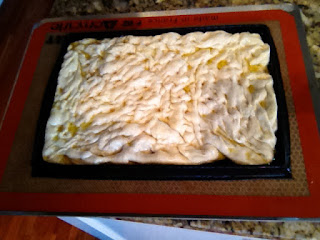
Put the dough onto the Deep Flexipat and begin pressing it out to fit the size of the pan. Turn the dough over to coat the other side with the olive oil. Continue to stretch the dough to fit the pan. As you are doing so, spread your fingers out and make finger holes all the way through the dough. (Poke through dough, this is strange, but when the dough rises again it will create the characteristic craggy looking focaccia. If you do not make the actual holes in the dough, the finished product will be very smooth.)
Put the dough in the warm place until it has doubled in size, about 1 hour. While the dough is rising a second time, preheat the oven to 425 degrees F.
Liberally sprinkle the top of the focaccia with some coarse sea salt and/or herbs de provence (or any other topping you enjoy-above picture is made with Alaea Hawaiian Sea Salt and Fresh Parmesan Cheese ). Bake the dough until the top of the loaf is golden brown, about 25 to 30 minutes. Remove the focaccia from the oven and let it cool before cutting and serving. You can lift the entire loaf out of the pan. I cut and serve it on a large cutting board since you cannot use knives on Flexipans.
(Recipe courtesy of Anne Burrell from Secrets of a Restaurant Chef)